02/03/23 - 02/05/23|Mijas Experience layout|SPAIN, Málaga, Mijas
Course information
01/11/23
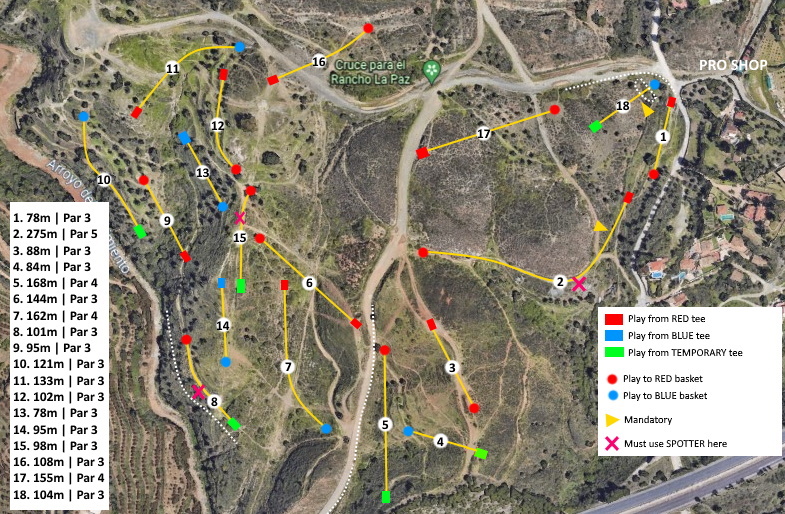
All three rounds will be played on a special layout designed for this event. This layout combines the best parts from Mijas regular Red and Blue layouts, with some nice special holes.
Caddy book can be downloaded HERE.
Course map can be downloaded HERE.
Read the course information carefully. You can make sure to play the correct holes by reading hole details always before starting to play a hole.
The regular Mijas Red and Blue courses are referred in the hole details. Red = Regular hole, tee and/basket at Mijas Red course. Blue = Regular hole, tee and/or basket at Mijas Blue course.
SPIKE BUSHES
You can get a casual relief from the spike bushes on the course. If your disc ends in a spike bush, mark your lie behind the bush (the first possible spot in the line of play) and play from there without penalty.
1. 78m | Par 3
Normal Red #1
2. 275m | Par 5
TEE: Red #2 tee
BASKET: Red #3 basket
MANDATORY: Restricted area on the right side. Marked with beach flag and red stripes. Must be passed from the left side. If missed, use the dropzone near the flag, with one penalty
SPOTTER: Must use spotter in the corner
3. 88m | Par 3
Normal Red #4
4. 84m | Par 3
TEE: Temporary tee near Red #5 tee, 10m behind regular tee on the top of the hill. Blue turf
BASKET: Blue #15 basket
NOTICE! Let hole #5 drive and move to their discs first
5. 168m | Par 4
TEE: Temporary tee near very near Blue #16 tee. Blue turf
BASKET: Red #5 basket
OB: Road and beyond on the left side. OB-line marked with sticks
6. 144m | Par 3
Normal Red #6
7. 162m | Par 4
TEE: Red #7 tee
BASKET: Blue #13 basket
8. 110m | Par 3
TEE: Temporary tee near Red #8 tee. Located on the walking path to hole #8. Blue turf.
BASKET: Regular Red #8 basket
SPOTTER: Must use spotter in the corner
9. 95m | Par 3
Normal Red #9
RELIEF AREA: The gorge is a relief area. If your disc ends to gorge, play from where the disc went to gorge or from dropzone in the corner (without penalty)
10. 121m | Par 3
TEE: Temporary tee near Red #10 tee. Blue turf
BASKET: Regular Blue #9 basket
OB: On the left side. Marked with sticks
11. 133m | Par 3
TEE: Red #12 tee
BASKET: Blue #5 basket
No OB on this hole
12. 102m | Par 3
Normal Red #14
SPOTTER: Must use spotter in the corner
13. 78m | Par 3
Normal Blue #11
14. 95m | Par 3
Normal Blue #12
15. 98m | Par 3
TEE: Temporary tee between Blue #13 and Red #16 tees. Blue turf
BASKET: Red #15 basket
SPOTTER: Must use spotter on the hill on left
16. 108m | Par 3
Normal Red #17
17. 155m | Par 4
Normal Red #18
18. 104m | Par 3
TEE: Temporary tee around the halfway of Blue #18 fairway. Blue turf.
BASKET: Blue #18 basket
MANDATORY: Restricted area on the right side. Power line mast is the mandatory, line marked with sticks. Must pass from the left side. If missed, continue from the dropzone with one penalty.
OB: Road and beyond around the fairway, marked with sticks + OB island in the small gorge, marked with sticks. Dropzone CAN NOT be used after OB shots.